English
 Français
 Español
 Deutsch
 Italiano
 العربية


When you use a hospital vein finder, you can start IVs faster and more easily. The device lets you see veins under the skin. This helps you know where to put the needle before you begin. It helps you miss less and makes patients feel less pain. For example, a new study showed that first tries work 85% of the time with advanced devices. With old ways, it only works 22% of the time:
|
Method |
First Attempt Success Rate |
|---|---|
|
GAPIV |
85% |
|
Traditional Peripheral Venous Catheter |
22% |
You might see that in hard cases, like with kids, the device helps you find veins faster and with fewer pokes. Many healthcare workers and students say this tool makes them feel more sure and helps them give better care.
Key Takeaways
-
Hospital vein finders help nurses see veins under skin. This helps them put needles in faster and more accurately.
-
Using a vein finder means fewer needle tries for patients. This makes the process hurt less and is more comfortable.
-
Getting ready and putting the patient in the right position is very important for IVs. Always check who the patient is and make sure they feel okay.
-
After using the vein finder, feel the vein with your fingers. This helps you know if the vein is good for IV access. Touch gives you important details.
-
Practice with vein finders on models to get better and feel more confident. This helps you make fewer mistakes when working with real people.
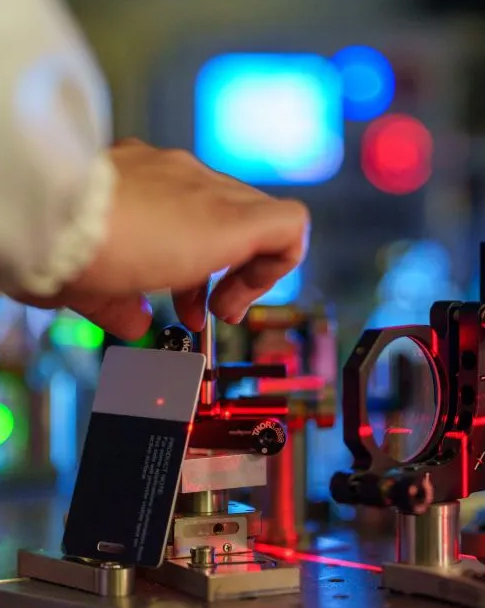
What Is a Hospital Vein Finder?
A hospital vein finder lets you see veins under the skin. Nurses and doctors use this tool in hospitals to find veins before starting an IV. It helps you pick the right spot, even when veins are hard to see or feel. Many nurses and doctors use a vein finder to help patients and lower the number of needle sticks.
Device Types and Features
There are different types of projection vein finders. Each one has special features for different needs. Some are small and easy to carry. Others have advanced imaging. The table below shows the main types and their features:
|
Type |
Battery |
Weight (grams) |
Key Features |
|---|---|---|---|
|
NIR |
100–240VAC |
275 |
Inverse mode, three brightness settings, True Center™ |
|
HD Imaging and Digital Full Field |
Fast-swap lithium-ion or AC |
726 |
Direct projection, Fine/Inverse Mode, Image Storing |
|
NIR |
Built-in rechargeable |
369 |
Three color modes, Always-on feature |
|
Real Multi-Exposure Image Fusion |
4400 mAh (5-10 hours) |
454 |
3 depth modes, six color projection systems |
|
Side-transillumination Technology |
Rechargeable Li-ion |
77 |
28 LED lights, 3 color modes, Auto cut-off switch |
Some devices use near-infrared light. Others use special imaging or LED lights. Many models let you change brightness or color for the patient’s skin. Some can save images for later.
How Vein Finders Work
Vein finder technology uses near-infrared light to find veins. This light shines on the skin and shows veins you cannot see. Here is what it does:
-
You can see veins under the skin.
-
The device helps you find veins for IV access or avoid veins during some procedures.
-
You can spot veins, valves, and branches that are hidden.
-
This helps you pick a better spot and give better care.
Tip: Even with a good vein finder, you still need to feel the vein with your hands before putting in the needle.
Some devices cost a lot and need training. Your skill and experience are still important. But a hospital vein finder helps you find a vein quickly and safely.
Using a Hospital Vein Finder
Preparation and Tourniquet Application
You need to prepare the patient before you use a vein finder. This step helps you keep the process safe and smooth. Follow these steps:
-
Ask the patient for their full name and date of birth. This helps you confirm their identity.
-
Ask if they have had any problems with needles or blood draws in the past.
-
Place a tourniquet about 3-4 inches above where you plan to insert the needle. Make sure it is tight enough to slow blood return but not so tight that it stops arterial flow.
-
Tell the patient to clench their fist. This action helps fill the veins and makes them easier to see.
-
If you need more time, remove and reapply the tourniquet. Do not leave it on for more than one minute.
-
Clean the area where you will insert the needle. This step helps prevent infection during venipuncture.
Tip: Always follow infection control guidelines. Clean your hands and use gloves before touching the patient or the device.
Operating the Vein Finder
You can use a vein finder to locate veins quickly and accurately. Here is how you should operate the device:
-
Confirm the patient’s identity and the procedure you will perform.
-
Label all tubes and supplies before you start.
-
Help the patient relax and keep their arm still.
-
Apply the tourniquet and turn on the vein finder. Use the device to locate veins under the skin.
-
Adjust the brightness or color settings if needed. Some devices use near-infrared light or other light sources to improve visibility.
-
Use the smart depth detection feature if your device has one. This feature helps you see how deep the vein is.
-
Once you have found a good vein, turn off the device before you insert the needle.
-
After the procedure, release the tourniquet and remove the needle smoothly.
-
Apply gentle pressure to the site and make sure bleeding stops.
-
Label any samples right away and dispose of sharps safely.
Note: Do not use the vein finder to guide the needle during insertion. Use it only to locate veins before you start.
Locating and Selecting a Vein
You need to choose the best vein for IV access. The table below shows common veins and their pros and cons:
|
Vein Type |
Advantages |
Disadvantages |
|---|---|---|
|
Dorsal Hand Veins |
Easy to access and see. |
Can be more painful because the skin is thin. |
|
Cephalic Vein |
Large and easy to feel. |
Harder to find in patients with more fat or muscle. |
|
Median Antebrachial Vein |
Good for short-term IV access. |
Avoid areas where the vein splits. |
|
Median Cubital Vein |
Large and easy to access. |
Often used for blood draws; can be hard to find in some patients. |
To find a suitable vein, you can:
-
Apply a tourniquet to help fill the vein.
-
Use gravity by lowering the arm or apply warmth to the area.
-
Feel for a vein that is bouncy and springy.
-
Use good lighting and vein finder technology to locate veins that are hard to see.
Palpation and Marking
After you use the vein finder to locate veins, you still need to feel the vein with your fingers. Palpation lets you check the size, depth, and how easy it is to reach the vein. This step is important for successful iv catheter insertion. You can mark the spot with a skin-safe marker if needed. This helps you remember the best place to insert the needle after you turn off the device.
Remember: Palpation gives you information that vein finder technology cannot. It helps you avoid veins that are too small, too deep, or not strong enough for the procedure.
IV Insertion Technique
Once you have marked the vein, you are ready to insert the needle. Do not use the vein finder to guide the needle. Instead, use your knowledge from visualization and palpation. Insert the needle at the correct angle and depth for the chosen vein. Watch for a flash of blood in the catheter, which shows you are in the vein. Secure the catheter and remove the tourniquet. Apply pressure to stop any bleeding.
Infection control is very important. Clean the site before and after insertion. Use gloves and follow hospital protocols. Teams that specialize in vascular access can help reduce infection and improve patient safety.
A hospital vein finder helps you locate veins faster and with fewer attempts. When you combine visualization, palpation, and good technique, you improve your success rate and make the experience better for your patients.
Vein Finder: Step-by-Step Guide
Patient Positioning
You need to start with proper patient positioning. This step helps you see the vein clearly and makes the process easier for both you and the patient. Ask the patient to sit or lie down with their arm extended on a flat surface. Make sure the arm is relaxed and supported. You can place a small pillow or rolled towel under the elbow for comfort. The palm should face upward. This position exposes the veins on the forearm and hand. Good positioning reduces movement and helps you avoid missing the vein during venipuncture.
Tip: Always check that the patient feels comfortable before you begin. A relaxed patient has veins that are easier to see and access.
Device Alignment
You must align the vein finder correctly to get the best view of the veins. Hold the device above the skin, keeping it steady and level. The distance between the device and the skin should match the instructions for your hospital vein finder. Most devices work best when you hold them about 6 to 10 inches above the skin. If you hold the device too close or too far, the image may blur or lose focus.
Use the settings on the device to adjust the brightness and color. Some vein finder technology uses near-infrared light, while others use different types of light. Adjust these settings to match the patient’s skin tone and the room lighting. Move the device slowly over the area where you want to locate veins. Look for the best image of the vein pattern. You may need to tilt the device slightly to reduce glare or shadows.
Note: Always keep your hand steady. Sudden movements can make the image jump and make it hard to see the vein.
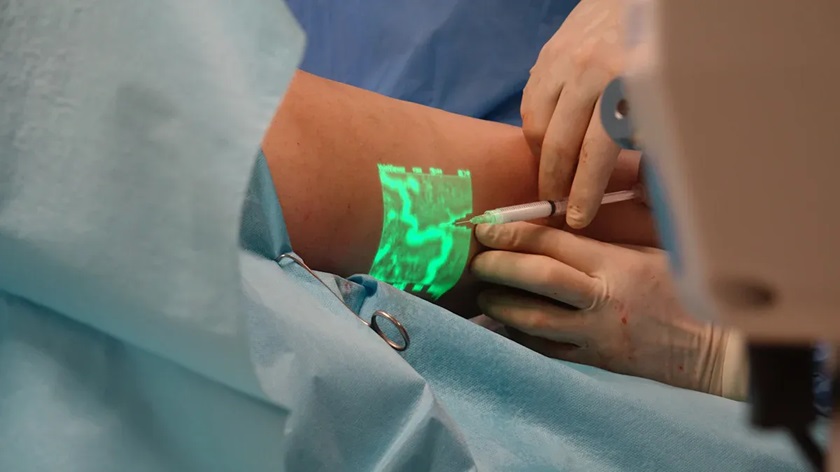
Real-Time Vein Visualization
Once you have aligned the device, you can use real-time vein visualization to find the best spot for iv catheter insertion. The vein finder projects an image of the veins onto the skin. You will see dark lines where the veins run. These lines show you the path, depth, and size of each vein. Some devices let you switch between different color modes or depth settings. This feature helps you see veins that are deeper or harder to find.
Follow these steps for real-time visualization:
-
Turn on the vein finder and wait for the image to appear.
-
Move the device slowly over the skin. Watch as the veins become visible.
-
Look for veins that are straight, wide, and not near any valves or branches.
-
Use your finger to gently press on the vein. Check if it feels springy and fills with blood.
-
Mark the best spot with a skin-safe marker.
Vein finder technology helps you locate veins that you cannot see with your eyes alone. The near-infrared light passes through the skin and highlights the veins. This process makes it easier to choose the right vein for iv access. You can avoid veins that are too small, too deep, or close to arteries. Real-time visualization also helps you avoid complications during blood draws or iv catheter insertion.
Remember: Always turn off the device before you insert the needle. Use your hands to feel the vein and confirm its location.
A step-by-step approach with a vein finder gives you confidence and improves your success rate. You help patients feel less pain and reduce the number of attempts needed for venipuncture.
Tips for Difficult Veins

Pediatric Patients
Starting an IV in children is often hard. Their veins are tiny and can move around. A vein finder helps you see these small veins better. Ask the child to stay still. You can distract them with a toy or a story. Warm the area with a warm pack. This helps the vein fill up with blood. Always pick the smallest needle that will work. After you find the vein with the device, feel it with your finger. This step helps you not miss the vein.
Tip: Speak softly and keep the child calm. When a child is relaxed, their veins are easier to see and use.
Elderly Patients
Older people have thin skin and weak veins. You must be gentle to avoid hurting them. The table below shows common problems and ways to fix them when using a vein finder on older adults:
|
Challenge |
Solution |
|---|---|
|
Thinner skin and fragile veins |
Use smaller gauge catheters and a vein stabilizer or vein viewer. |
|
Decreased vein elasticity |
Hold the vein with your other hand and pull gently to keep it still. |
|
Less visible and palpable veins |
Use vein illumination technology or ultrasound; keep the arm lower than the heart. |
|
More frequent valves and tortuous veins |
Feel for valves and try to avoid them; ultrasound can help find deeper veins. |
Always use soft pressure and do not pick veins that roll or feel weak. Vein finder technology helps you see veins that are hard to find in older patients.
Obese or Edematous Patients
People with more fat or swelling have veins that are hard to see. Old ways may not work well for these patients. A vein finder uses near-infrared light to show veins you cannot see or feel. Here are some ways this tool helps:
-
Extra tissue makes veins hard to see in obese patients.
-
Vein finder technology uses light to make veins show up.
-
Digital imaging lets you see blood vessels on the skin.
-
You can find veins faster and poke fewer times.
-
This method helps you succeed more with hard-to-find veins.
Dehydrated or Shocked Patients
If a patient is dehydrated or in shock, veins can shrink or hide. You can use different tricks to make veins easier to see. The table below lists helpful ways:
|
Technique |
Description |
|---|---|
|
Near-Infrared (NIR) Visualization |
Uses NIR technology to make veins easier to see. |
|
Isometric Exercises |
Ask the patient to squeeze their fist to fill the veins. |
|
Tourniquet Application |
Put on a tourniquet to make the vein stand out. |
You can also lower the arm or gently rub the area. Sometimes, a doctor may use a medicine to open the vein. A hospital vein finder with near-infrared light works well for these patients.
Note: Always use your fingers to feel the vein after using a vein finder for the best results.
Clinical Benefits of Vein Finders
Patient Comfort
You want your patients to feel comfortable during venipuncture for blood withdrawal. A vein finder helps you reach this goal. The device uses light to show veins under the skin, so you do not have to poke around. This reduces pain and stress. Many patients, especially children and older adults, feel less anxious when you use an infrared vein finder. You can see the difference in comfort by looking at the numbers:
|
Measure |
Vein Finder Group |
Traditional Group |
|---|---|---|
|
Mean NIPS Score |
5.75±1.11 |
6.83±1.35 |
|
Mean Crying Duration (min) |
2.94±0.25 |
5.61±1.10 |
|
Duration in Deep Sleep (min) |
15.36±3.12 |
4.57±1.65 |
|
Active Alert States (min) |
4.30±1.74 |
10.95±3.28 |
|
First-Attempt Success Rate |
87.1% |
46.8% |
You can see that vein finder technology leads to less pain and faster recovery. The benefits of using a vein finder include fewer failed attempts and less crying in children. The infrared vein viewer also helps you improve accuracy and patient satisfaction.
First-Attempt Success
You want to get blood on the first try. Vein finders make this possible. The device helps you see difficult-to-find veins, so you do not miss. Studies show that vein finders increase first-attempt success rates for blood sample collection. Look at the chart below to compare results:
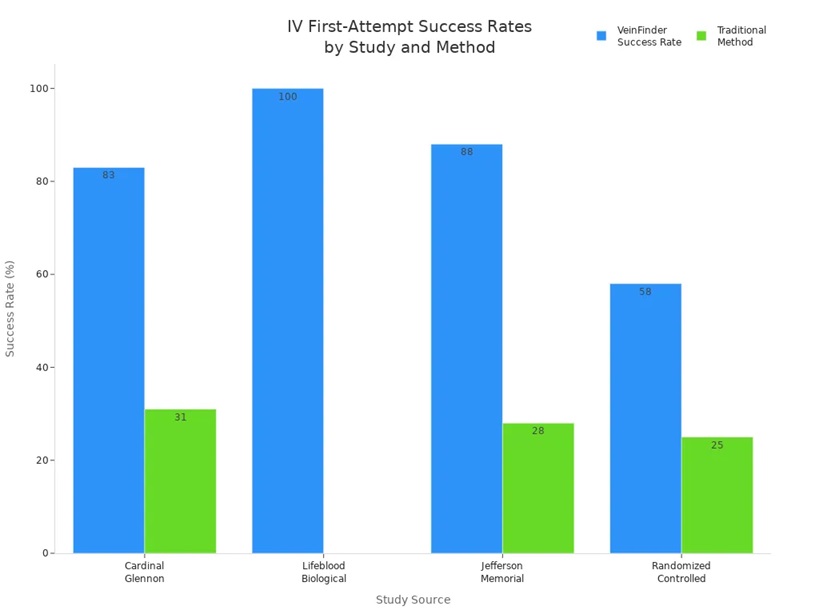
You can see that vein finders help you succeed more often than traditional methods. This means less pain and less time for your patients. You also feel more confident when you use a vein finder.
Fewer Complications
You want to avoid problems like infiltration or hematoma during blood sample collection. Vein finders help you do this. The device lets you see the vein before and after you insert the needle. You can check if blood flows well and spot problems early. This reduces the risk of complications. The vein finder also helps you choose the best vein, which lowers the chance of missing or causing injury. You can use the light from the device to see if the blood is moving as it should.
|
Evidence |
Description |
|---|---|
|
VeinViewer's effectiveness |
It helps locate more vein access options, reducing stick attempts and complications. |
|
Assessment of IV patency |
It allows for visualization of fluid flushing and detection of hematomas. |
You can trust vein finders to improve accuracy and safety during venipuncture for blood withdrawal. The benefits of using a vein finder include better outcomes for you and your patients.
Common Mistakes and Troubleshooting
Device Misuse
Using a hospital vein finder might look easy, but mistakes happen. If you hold the device too close or too far, the image gets blurry. Always read and follow your device’s instructions. Some people forget to turn off the device before using the needle. This can distract you and make you miss the vein. Only use the device to find veins, not to guide the needle. If you skip feeling the vein with your fingers, you might pick one that is too small or deep. Always look at the vein and feel it before you start.
Tip: Practice with vein simulators first. This helps you learn and avoid mistakes.
Poor Lighting or Positioning
Good lighting and positioning help you see veins better. If the room is too dark, the image may not be clear. Use normal room light for best results. Hold the device at the right angle and distance. Press gently and keep the device level. If you press too hard or tilt the device, you might miss veins or see wrong images. The table below shows what matters most for success:
|
Factors Impacting Success |
Factors Not Impacting Success |
|---|---|
|
Proper technique (correct pressure and positioning matter) |
Patient skin tone (works equally on all) |
|
Extreme tissue depth (>6mm veins may not visualize) |
Patient age (effective pediatric to geriatric) |
|
Severe edema (adds density but usually still works) |
Clinician experience level (works for novice and expert) |
|
Massive obesity with deep veins (may need larger catheter) |
Ambient lighting (works in normal light) |
|
Extensive scar tissue (can limit visualization) |
N/A |
Check for scar tissue or swelling before using the device. If veins are deep or hidden, you may need a bigger catheter.
Troubleshooting Visualization
Sometimes, veins are hard to see even with the device. You can try different things to help:
-
Make sure the patient drinks water. This helps veins fill up.
-
Put a warm towel on the area. Heat makes veins show up better.
-
Ask the patient to squeeze their fist. This pushes blood into the veins.
-
Tap the skin gently to help veins open.
-
Pull and stretch the skin to keep the vein steady.
-
If space is tight, bend the needle a little.
-
Practice on a vein simulator to get better.
-
Use ultrasound for deeper veins.
-
Use the vein finder to see veins you cannot see with your eyes.
Note: Always feel the vein with your fingers before using the needle. This helps you hit the vein and not waste blood.
If you follow these steps, you will collect blood more easily and help your patients feel better.
You can get smooth IV access by doing a few steps. First, get the patient ready. Next, use the vein finder to see the veins. Then, feel the vein with your fingers to check it. Put in the IV needle carefully. When you use both the device and your hands, you do better. This is very helpful if you are new to IVs. If you keep practicing, you will get faster and need fewer tries.
|
Key Takeaway |
Description |
|---|---|
|
Improved Accuracy |
Vein finders help you find veins more exactly. |
|
Increased Patient Comfort |
Fewer needle pokes mean less pain and worry for patients. |
|
Efficiency in IV Access |
You save time and help patients sooner. |
|
Applicability in Challenges |
These tools work well for kids and older people with hard-to-find veins. |
When you use these steps, you feel more sure of yourself and your patients feel safer.
FAQ
How does a hospital vein finder work?
A hospital vein finder uses near-infrared light. This light shows your veins under the skin. You see the veins as dark lines. The device helps you find the best spot for IV access.
Can you use a vein finder on all patients?
You can use a vein finder on most patients. It works well for children, older adults, and people with hard-to-find veins. Some very deep veins may not show up clearly.
Do you still need to feel the vein after using the device?
Yes, always feel the vein with your fingers. The device shows you where the vein is, but your touch tells you if the vein is strong enough for an IV.
Is it safe to use a vein finder?
You can use a vein finder safely. The device uses light, not radiation. Always clean the device before and after use to keep patients safe.

 IPv6 network supported